
Install Snakemake
To simplify this tutorial, install Snakemake using conda. See the conda tutorial on this site if you need guidance for that process.
Create conda environment with snakemake installation
conda create -n snake_env
Activate the environment and install snakemake into it
conda activate snake_env
conda install -c bioconda snakemake
conda install pydot  # will let us see graphs of the workflows
Create a new directory for us to play around in
mkdir snaketest
Create a Snakefile
All Snakemake workflows require a “Snakefile”. This is a file that dictates the workflow, including inputs/outputs, commands, etc. Snakefiles are easy to read after you learn the basics (which you will!). For simplicity, we will call our snakefile “Snakefile”, but you can name it anything.
touch Snakefile
Snakefile keywords
Phew, good job! Now let’s cover some basics about what the snakemake syntax looks like. The syntax is something of a hybrid between Python and YAML (Yet Another Markdown Language). You specify rules with the phrase rule ____: where the underline is the name you want for the rule. Then beneath the rule name, you will tab-indent (in classic Python and YAML fashion) and use a series of keywords followed by a colon (:) to specify what the rule does. The most common keywords are
input:- the input file or files for the ruleoutput:the output file or files for the rulelog:output files for the rule that are ignored by rule-matchingmessage:helpful text when the rule is runningthreads:number of threads to use for the ruleparams:any miscellaneous parameters that may be relevant forscript,shell, orwrappershell:one or multiple shell (bash) commandsscript:one or more python commandswrapper:advanced scripts compatible with snakemake
All Snakefiles require a rule all: at the top with an input: keyword that specifies the file targets you want at the very end of the pipeline. Snakemake takes those file targets and reads your Snakefile backwards to figure out what order the rules need to be run to create those final files given the inputs/outputs of all the rules and what files are and aren’t present in your working directory. You can think of snakemake as trying to do the least amount of work necessary to accomplish the goal you give it.
There are lots of other moving pieces in snakemake than are explained in this tutorial, like config.yaml files, splitting Snakefiles into smaller rulesets, using raw python code, cluster scheduling, etc. For those advanced concepts, see the snakemake documentation.
Graph the workflow
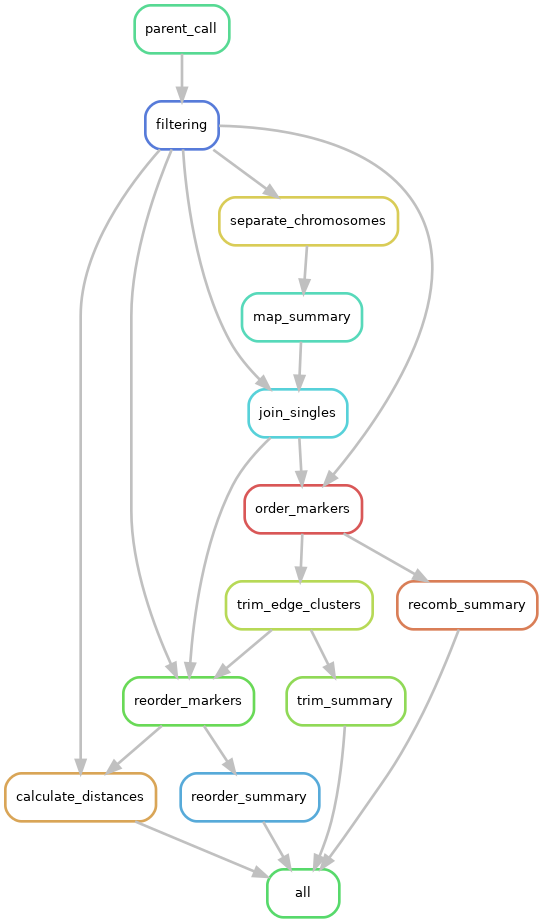
At any point, you can have snakemake create a directed acyclic graph (“DAG”) of your workflow, which can be pretty handy. Here is a DAG of the very last Snakefile we create in this tutorial.
snakemake -s Snakefile --rulegraph | dot -Tpng > rulegraph.png
These can get fairly complex, like the one used for LepWrap:
Baby’s first Snakefile
And lets add the first rule to the file, the rule all
# this is the snakefile
rule all:
	input: "file1.txt"
By itself, this will error out because there are no other rules that could possibly make the file file1.txt that we are specifying as an input. So, let’s add a second rule to create it.
rule all:
	input: "file1.txt"

rule touchfile:
	output: "file1.txt"
	shell: "touch file1.txt"
Now we can run it in a normal shell session with
snakemake Snakefile
Using variables
Let’s modify the snakefile a bit to learn about variables
rule all:
	input: "file1.txt"

rule touchfile:
	output: "file1.txt"
	shell: "touch {output}"
For each rule, you can reference another section of the rule with curly braces. In the example above, we’re referencing the output part of rule touchfile with {output}, which will do a drop-in replacement of {output} to whatever we said the output will be, in this case "file1.txt". Note that the rule is self-referencing, that is, within touchfile, you’re only referring to the output that’s inside rule touchfile and not the output of any other rule.
Message text
We can add useful messages for the current rule with the message keyword.
rule all:
	input: "file1.txt"

rule touchfile:
	output: "file1.txt"
	message: "Generating file {output}"
    shell: "touch {output}"
Like before, the {output} variable will be replaced at runtime with the actual value of output.
Adding threads/cores
This can be done with the threads keyword, and you supply a value
rule all:
	input: "file1.txt"

rule touchfile:
	output: "file1.txt"
	threads: 5
	message: "Generating file {output} using {threads} threads"
    shell: "touch {output}"
Notice we changed the message to include the {threads} variable. Even though what we’re doing now isn’t multithreaded, I’m doing it to prove a point.
# the output
Provided cores: 1
Rules claiming more threads will be scaled down.
Job counts:
	count	jobs
	1	all
	1	touchfile
	2

Job 1: Generating file file1.txt using 1 threads

Finished job 1.
1 of 2 steps (50%) done

localrule all:
    input: file1.txt
    jobid: 0

Finished job 0.
2 of 2 steps (100%) done
Since we didn’t specify any cores, it defaults to 1, and all occurrences of threads in the entire snakefile will be scaled down to however many cores you specify. You can see this reflected in the message text. This is really handy because you can specify a number like we did with 5 above, and Snakemake gives you the flexibility to not need to change those values at runtime. If we wanted to use all 5 cores, then we can run
snakemake --cores 5

Provided cores: 5
Rules claiming more threads will be scaled down.
Job counts:
	count	jobs
	1	all
	1	touchfile
	2

Job 1: Generating file file1.txt using 5 threads

Finished job 1.
1 of 2 steps (50%) done

localrule all:
    input: file1.txt
    jobid: 0

Finished job 0.
2 of 2 steps (100%) done
Note that just because you specify threads doesn’t mean Snakemake will magically multithread what you’re trying to do. The {threads} variable is useful to insert into programs that request threads, like minimap2 -t {threads} wasp.fasta wasp.genome.fasta, or when you are iterating through wildcards.
Params
Another keyword we can add is params that will store various parameters of things we’re trying to run in a particular rule. This is useful for creating a very legible list of command line parameters, especially if wildcards are involved.
rule all:
	input: "file1.txt"

rule touchfile:
	output: "file1.txt"
	threads: 5
	message: "Generating file {output} using {threads} threads"
	params: "-m"
    shell: "touch {params} {output}"
Here we’re adding the -m flag to touch, saying we only want to update the modification time of existing file file1.txt. We could just as well have had the shell command be touch -m {output}, but it’s good practice to have these parameters split out, especially when we have a lot of time.
Multiples of things
Specifying things in snakemake also gives us the functionality to
- Have multiple inputs and multiple outputs
- Name the variables within the keywords and reference them specifically
Here we’re introducing a few new concepts in how rules can be structured. For example, let’s say we want to map some reads onto a reference genome with minimap2.
rule map_reads:
    input:
        reference = "persian_walnut.fasta",
        read_f = "p_walnut.F.fa",
        read_r = "p_walnut.R.fa"
    output:
        out_bam = "p_walnut.bam"
    threads: 16
    message:
        """
        Mapping {input.read_f} and {input.read_r} onto {input.reference}
        """
    shell:
        """
        echo "Running on {threads} threads"
        minimap2 -t {threads} {input.read_f} {input.read_r} {input.reference} > {output}
        """
Now let’s dissect the new stuff:
Naming entries
First, you can name the entries under a keyword, such as reference = "persian_walnut.fasta" and refer to them later with {keyword.name} as we have with {input.reference}. Note that we didn’t have to specify {output.out_bam} in the example because output only has one entry. If we were to use {input} without specifying anything further, it would “splat” the contents of input wherever you had {input}. In other words, {input} here would be the equivalent of persian_walnut.fasta p_walnut.F.fa p_walnut.R.fa
Multiple entries per keyword
You can have several entries for each keyword. It’s usually best/safest to name them for reference later. Notice that when listing multiple items under a keyword, there is a comma at the end of each line except the last entry.
Tabs
You should have noticed the structure of a keyword when it’s multi-line, that is, that you use a tab to indicate (parent/child) hierarchy. As seen in input, output, message, and shell, we are tab-indenting the components within that keyword. Although snakemake is something of a hybrid of Python and YAML syntaxes, it sticks with the strict tabbing of Python. Since we have only one entry in output, we could have also written it as
rule map_reads:
	...
	output:
		"p_walnut.bam"
	threads: 16
	...
if we wanted to keep a consistent visual theme for keywords and entries.
Blocks
Another new concept is creating string “blocks” using three double-quotes. This is especially important for shell and script (invoking raw python code) keywords when you want to run multiple lines of commands within a rule. In the shell example above, we have two lines of code, one calling echo and the next calling minimap2. The text within these blocks need to be aligned to the quotes like you see above.
Wildcards
Wildcards are probably the most useful and frustrating part of learning Snakemake and getting things to work correctly. Snakemake has a system for “globbing” wildcard statements and expanding them depending on what it can find in your project directory. You can think of it as a kind of GNU find mechanism. To demonstrate this better, let’s create a few more files.
for i in {1..3} ;do
    touch file.$i.txt
done
For the wildcard mechanic to be its simplest and least frustrating, you’ll want standardized names for files you’d like to glob. Standardized in terms of being easy to pattern-match. In the loop above, we create 3 files that follow the convention file.number.txt. This makes it easy to create a match pattern. To think of it in bash terms, a matching pattern would be file.*.txt. In Snakemake, we will do something similar, except we can assign a name to that wildcard. In snakemake, it looks like
rule all:
	input: "converted.2.txt"

rule something:
	input:
		infiles = "file.{thing}.txt"
	output:
	    outfiles = "converted.{thing}.txt"
	message: "Converting {input} to {output}"
	shell:
		"""
		echo {input}
		"""
Using curly braces, we created a wildcard thing that will be replaced by the actual values as if doing a pattern search of file.*.txt. Everything that we put thing into in our rule will “lock in” a value of thing for that iteration (like a loop). In this example, thing will be replaced everywhere with 2 for a single iteration. We will explore more complex examples below. Run this snakefile and you will get this error:
Provided cores: 1
Rules claiming more threads will be scaled down.
Job counts:
	count	jobs
	1	all
	1	something
	2

Job 1: Converting file.2.txt to converted.2.txt

file.2.txt
Waiting at most 5 seconds for missing files.
Error in job something while creating output file converted.2.txt.
MissingOutputException in line 10 of /home/pdimens/test/Snakefile:
Missing files after 5 seconds:
converted.2.txt
This might be due to filesystem latency. If that is the case, consider to increase the wait time with --latency-wait.
Will exit after finishing currently running jobs.
Exiting because a job execution failed. Look above for error message
Which has some great things to dissect! First, snakemake was only going to create converted.2.txt because our target output (from the input of rule all) forced {thing} to assume the value of 2 (snakemake cleverly works backwards that way). Second is that since we didn’t actually create any output files, snakemake throws an error at us saying exactly that: our job is finished, but it can’t find the specified output files. So, let’s change the shell script to create the file.
rule all:
	input: "converted.2.txt"

rule something:
	input:
		infiles = "file.{thing}.txt"
	output:
	    outfiles = "converted.{thing}.txt"
	message: "Converting {input} to {output}"
	shell:
		"""
		echo {input}
		cp {input} {output}
		"""
and tada! that output tells us everything worked out:
Provided cores: 1
Rules claiming more threads will be scaled down.
Job counts:
	count	jobs
	1	all
	1	something
	2

Job 1: Converting file.2.txt to converted.2.txt

file.2.txt
Finished job 1.
1 of 2 steps (50%) done

localrule all:
    input: converted.2.txt
    jobid: 0

Finished job 0.
2 of 2 steps (100%) done
But we don’t want just the one file, we want all of them, with which we can introduce expansions.
Wildcards and bash variables
There are cases in bash where you may need to use curly braces (e.g. variables, AWK). As you’ve noticed, snakemake pays special attention to curly braces and uses it for its own wildcard system, therefore if you need to use curly braces in bash code, you will need to “escape” them by using double-braces. In other words, if we define a variable TOMATO=5 in a shell block, in order to use the classic bash syntax to call tomato, we would have to use ${{tomato}} because ${tomato} will give us an error since snakemake will assume it’s one of its own variables. This makes AWK commands look even messier than usual. However, if you place your code in external script files (explained below), you can use standard curly braces as usual– this caveat is exclusive to text within snakefiles.
Wildcard Expansion
In snakemake, you can use the expand function to force an expansion of a wildcard with some kind of constraints. Let’s look at this in practice:
expand("p_walnut.{avalanche}.fa", avalanche = [1,2,3])
expand works by taking a string containing one or more wildcards as the first argument, and a definition of those wildcards as the subseqent arguments. I chose avalanche as the wildcard to demonstrate that you can choose any words you like for the wildcards (but descriptive is always preferred). The command above will evaluate to this vector of strings:
"p_walnut.1.fa", "p_walnut.2.fa", "p_walnut.3.fa"
And here is an example of using multiple wildcards for an expansion
expand("p_walnut_{num}.{read}.fa", num = [1,2,3], read = ["F","R"])
where this will expand to a vector of 6 strings, one for every combination of num and read
"p_walnut_1.F.fa", "p_walnut_1.R.fa", "p_walnut_2.F.fa", "p_walnut_2.R.fa", "p_walnut_3.F.fa", "p_walnut_3.R.fa"
Now we can combine this concept to create a rule all target that does all the conversions
rule all:
	input: expand("converted.{num}.txt", num = [1,2,3,4,5,6,7])

rule create:
	output:
		outfiles = "file.{thing}.txt"
	message: "creating {output}"
	shell:
		"""
		touch {output}
		"""

rule convert:
	input:
		infiles = "file.{thing}.txt"
	output:
		outfiles = "converted.{thing}.txt"
	message: "Converting {input} to {output}"
	shell:
		"""
		cp {input} {output}
		"""
Note here is an opportunity that we can parallelize things. Since each rule is iterative 7x because we have 7 target files, if we run snakemake with snakemake --cores 3, it should be able to run the jobs within a rule in parallel, 3 at a time.
Adding scripts
One can comfortably inject python and bash code into the script and shell keywords respectively, but you can also create scripts externally and call them within a rule, like you would in any regular bash session. Let’s create a script named convert.sh that does this same “conversion”.
#! /usr/bin/env bash

cp $1 $2
Here we’re being lazy and establishing that this script takes two positional arguments, the first ($1) being the input, the second ($2) being the output. Like mentioned above, since this is outside of a snakefile, we don’t need to adhere to any special rules. Note make this script executable with chmod +x convert.sh. Now, let’s use this script in our snakefile:
rule all:
	input: expand("converted.{num}.txt", num = [1,2,3,4,5,6,7])

rule create:
	output:
		outfiles = "file.{thing}.txt"
	message: "creating {output}"
	shell:
		"""
		touch {output}
		"""

rule convert:
	input:
		infiles = "file.{thing}.txt"
	output:
		outfiles = "converted.{thing}.txt"
	message: "Converting {input} to {output}"
	shell:
		"""
		./convert.sh {input} {output} #   <--- this is the only thing we changed
		"""
And when you run it, everything will happen just like before, except you outsourced a bit of code from the snakefile to an external script. This can be very useful, especially if you’re working with large complicated custom scripts. A good practice is to create a scripts/ folder in your working directory and put custom scripts there, then reference them with ./scripts/convert.sh. If Snakemake is all about order and organization, then it would make sense for us to curate the structure and organization of our working directory.
Mix in R
It’s more than likely you will want to incorporate some R into what you’re doing. In a snakemake setting, you cannot (to my knowledge) have it stop and open up an R session for you to manually run lines of code, but neither would you want it to. One of the points of snakemake is to make a series of explicit rules that automates doing tasks, therefore it stands to reason that if you need to use R, you will use it much in the same way you will be using bash/python/ruby/java/c++ etc. during a workflow– as a script or program. Many R users use R as interactive sessions, often through RStudio or Jupyter notebooks, but we will need to use it as scripts that will run independently of user input. One of the easiest ways to make an R file script-friendly is to specify allowing trailing arguments in the file header:
args = commandArgs(trailingOnly = TRUE)
# make sure the script is running from the working directory
setwd(getwd())
# load any libraries
library(somelib)
library(someotherlib)
What this does is establish a variable args that will be a list of all the trailing arguments when you run this script, i.e. just like how bash has $1, $2, etc. for trailing positional arguments, your R script now has args[1], args[2], etc. for the same effect. To demonstrate it more explicitly:
./convert.sh file1.txt file2.txt
# $1 = file1.txt
# $2 = file2.txt

Rscript ./convert.r file1.txt file2.txt   # let's pretend we wrote an R script to do the same conversion
# args[1] = file1.txt
# args[2] = file2.txt
Oh yeah, to run entire Rscript files via command line, you would start the command with Rscript filename.r. You could also add the shebang #!/usr/bin/env Rscript into the file. You can also incorporate R scripts as a wrapper and load in variables from the Snakemake rule itself into the R session with a custom S4 object Snakemake provides. It’s a bit more advanced, but you can read about it here
R in practice
Let’s first create a CSV file, then build a little R script that does stuff with it.
echo "age,size,year,index" > table.txt
for i in {1..30}; do
	echo "1,2,3,4" >> table.txt
done
Which creates this table of junk data
age,size,year,index
1,2,3,4
1,2,3,4
1,2,3,4
1,2,3,4
...
1,2,3,4
1,2,3,4
1,2,3,4
1,2,3,4
Now we can build an R script named plot_things.r that imports this table and does things to it. Let’s configure this R script to
- import the table we made
- create a new column using some data in the table
- plot the thing we did and write it to a .pdf file
- write the new table to a file
- and let’s make the setup such that the arguments will be in the order of
- input table
- output table
- output pdf
args = commandArgs(trailingOnly = TRUE)
setwd(getwd())

data <- read.table(args[1], header = TRUE, sep = ",")

data$rand <- data$age + runif(30) / data$year

write.csv(data, file = args[2], row.names = FALSE, col.names = TRUE)

pdf(file = args[3])
plot(data$rand, pch = 19, col = "blue")
dev.off()
and just like before, we’ll make it executable with chmod +x plot_things.r.
Now we can write a new rule to execute this R script
rule all:
	input:
		files = expand("converted.{num}.txt", num = [1,2,3,4,5,6,7]),
		table = "table_mod.txt"

rule create:
	output:
		outfiles = "file.{thing}.txt"
	message: "creating {output}"
	shell:
		"""
		touch {output}
		"""

rule convert:
	input:
		infiles = "file.{thing}.txt"
	output:
		outfiles = "converted.{thing}.txt"
	message: "Converting {input} to {output}"
	shell:
		"""
		./convert.sh {input} {output}		# this is the only thing we changed
		"""

rule create_table:
	output: "table.txt"
	shell:
		"""
		echo "age,size,year,index" > {output}
		for i in {[1..30]}; do	# notice the double braces!
			echo "1,2,3,4" >> {output}
		done
		"""

rule plot:
	input: "table.txt"
	output: "table_mod.txt"
	log: "table_plot.pdf"
	shell:
		"""
		Rscript ./plot_thngs.r {input} {output} {log}
		"""
A few things to note here:
- We added
"table_mod.txt"torule allas a target. If that specification wasn’t there, snakemake would only perform the necessary rules/tasks to generate your target and ignore the rest. - We see a new keyword
log. This is another output file specification for files that are not used for matching rule input/outputs. If you are using wildcards forinputoroutput, your files inlogwill need to use the same wildcards or snakemake will scold you that it needs to be that way. In the rule above, since we aren’t using any wildcards in that rule, we should be ok.
Navigating directories
All paths in snakemake should be relative paths (e.g. ../some/folder vs /home/evhalen/music/1984/). They can be absolute paths, but keep in mind a good snakefile should work on any system with the appropriate working directory setup, so absolute paths don’t make sense given that philosophy. A good snakemake workflow reads and writes data for a really nice and organized folder structure. Something like
working dir
|__data
|__scripts
|__ANOVA
    |__plots
|__randomforest
    |__plots
|__etc...
Which also means that your rule input/outputs need to reflect the desired folder structure. A great convenience feature of snakemake is that it will create any directories you specify in output if they don’t already exist. Here’s an example by modifying the very first rule we made in this tutorial:
rule all:
	input: "/this/is/a/deep/folder/file1.txt"

rule touchfile:
	output: "this/is/a/deep/folder/file1.txt"
	shell: "touch {output}"
Snakemake will create all 5 directories to make the path this/is/a/deep/folder/ so you don’t have to(!), which creates this wild and inefficient folder structure, but nonetheless it automates the process.
.
|__Snakefile
|__this
  |__is
    |__a
      |__deep
        |__folder
          |__file1.txt
Conda environments
At any point, you can export your conda environment into a “blueprint” that stores the packages your environment uses and their versions for 100% reproducibility. To do so, use the command
conda env export | grep -v "^prefix: " > my-environment.yml
The grep part is optional, but it’s better to use it to omit the specific prefix for better interoperability with whatever system you port it to. To create a conda environment from an exported blueprint (the .yml file) you use
conda env create -f my-environment.yml